1/MEET THE MC-10!
Carefully unpack the Computer. Remove all packing material and save it just in case you ever need to transport the MC-10. Locate all cables and papers that may be included in the shipping carton.
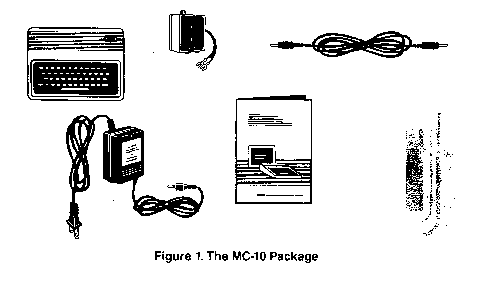
When you take your new MC-10 out of the box, be sure the package includes:
- The MC-10 itself.
- An Antenna Switch that connects the Computer to the TV.
- A Connecting Cable that connects your MC-10 to the TV.
- A Power Supply that connects your MC-10 to a wall outlet. (Use only the Power Supply included with this package!)
- This Manual.
- Quick Reference Card.
Before connecting the MC-10 to a TV or a power source (or before doing anything else for that matter), be sure you're familiar with your MC-10. Remember that proper operation of the Computer depends on proper connection to the TV, to power sources, and to optional equipment (such as a printer or cassette recorder).

Read the following section carefully so you are completely familiar with the MC-10 before going ahead.
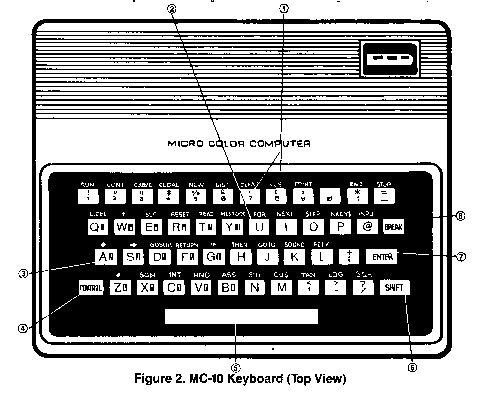
(1) Command Keys The Micro Color BASIC keywords (and other special symbols) listed above the regular keys can be accessed by pressing [CONTROL] and the key just below the statement you wish to use.
(2) Regular Keys For normal operation, simply press these keys. Note: You will not have to press shift to produce uppercase letters. The MC-10 is normally in "All-Caps" Mode.
(3) Graphics Character Keys A few keys, such as this one, have alternate definitions that allow you to display Block Graphics Characters on the Screen. To produce these characters, press [SHIFT] and one of the keys that has a Graphics Character on it.
(4) [CONTROL] This is the "control" key which lets you perform special operations when it is pressed in conjunction with other keys. For instance, you can use the predefined Micro Color BASIC commands, backspace the Cursor, delete the current program line, and more.

(5) [SPACEBAR] When you want to move the Cursor to the right, press this key.
(6) [SHIFT] This key allows you to display the alternate definition some keys have. This includes punctuation symbols and Graphics Characters. You will not have to press [SHIFT] to produce uppercase letters. The MC-10 is normally in "All-Caps" Mode. If you enter Upper/Lowercase Option Mode (by pressing [SHIFT][0], lowercase letters will be displayed in reverse video and you will have to press [SHIFT] to produce uppercase letters.
(7) [ENTER] To "enter" a program line or execute a command, press this key. It is essentially the same as the carriage return key on a standard typewriter.
(8) [BREAK] To stop (or "break") program execution and return to the OK prompt, press this key.
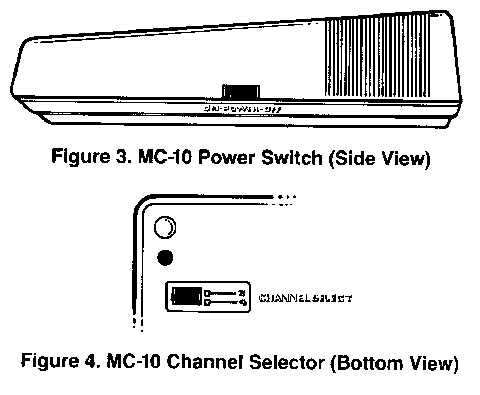
Once the MC-10 is properly connected to a power source, the TV, and any optional equipment, set this switch to ON.
Be sure the setting of this switch matches the channel you've selected on the TV. Which channel (either 3 or 4) should you use? That depends on the channel that is either weaker or not used in your area. Try both, then use the channel which produces the best quality display.

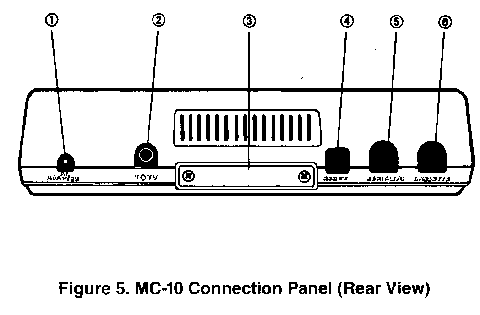
(1) AC ADAPTER Connect the Power Supply included with the package to this connector.
(2) TO TV Connect one end of the Connecting Cable included with this package to this connector. Connect the other end of the Cable to the Antenna Switchbox which should be connected to your TV. (Both ends of the cable are the same.)
(3) Memory Expansion Connector This slot is reserved for future memory expansion kits.
(4) RESET Button If the computer ever "hangs-up" or if you ever want to start over, press this Button.
(5) RS-232C Connector When connecting the MC-10 to a serial printer, use this connector
(6) CASSETTE Connector To store and retrieve programs or data, connect the cassette recorder to this connector.

|
|